Content
Adding In-App Subscriptions to your iOS app using Glassfy, SwiftUI, and Swift Concurrency

At some time in your journey as an iOS developer, whether you work for a company, or you are an independent developer creating your own apps, you will likely have to deal with App Store Connect and in-app purchases.
Apple has made it somewhat easier with StoreKit 2, but it is still not straight forward. That is, unless you use a third party solution to help you out.
If you are struggling with StoreKit and how you can add in-app subscription purchases to your iOS app, then Glassfy is the solution for you. With Glassfy, you can quickly and easily start monetizing your app in just a few simple steps using SwiftUI and Swift Concurrency introduced in iOS 15.
In this article you will learn to:
1. Configure your app in App Store Connect to accept a single recurring subscription.
2. Configure Glassfy to act on your applications behalf to communicate with the App Store.
3. Add the Glassfy SDK to your application and enable in-app subscriptions to verify, purchase or restore subscriptions.
Configure your app in App Store Connect to accept a single recurring subscription.
Before you can add in-app subscription to your application, you need to first enable that feature in App Store Connect.
**Create an In App Purchase
**1. Open your application in App Store Connect and select the In App Purchase link from the Features Section.
2. Tap on the + Button
3. Choose an Auto-Renewable Subscription and click on create.
4. You will next be asked to enter a reference name and a Product ID
Reference Name: The reference is only used in App Store Connect and in Sales and Trends reports from Apple. This is for your reference only.
Product ID: The product Id is a unique alphanumeric ID that is used for accessing your product in development and syncing with Glassfy. This ID is unique across all of your apps so you cannot have two different apps with the same subscription Product ID, so it is important that you adopt a naming scheme for all of your apps that will help you in this and future configurations. For this reason, Glassfy recommends that you adopt a scheme that includes some or all of the following components, (depending on your requirements) concatenated into a single string that is no longer than the maximum 64 characters.
platform
app identifier
feature to unlock
feature variation
duration
price
introductory offer duration
offering price
For example, if your iOS app is named My Great App, you might want to create an app identifier like MGA where the feature to unlock is allAccess with a duration of monthly at a cost of $1.99 your Product ID would be:
iOS_MGA_allAccess_monthly_199
Click on next
5. All subscriptions need to be part of a subscription group. For example, for the all access feature, we have a monthly subscription, but we may also eventually add a yearly subscription. Both of these are for the same feature, so you can create a subscription group for this feature.
6. Add a Subscription duration and click on Save
7. Click on + to add a Subscription price
8. Choose a currency and value
9. Modify other currencies if desired and click on Create
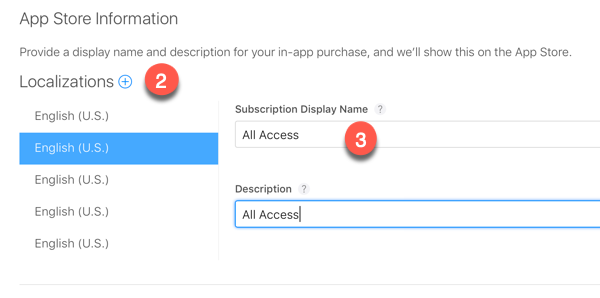
Adding Localization
The final step you will need when setting up an in-app subscription for testing is to add localization information for each of the languages/countries that you want to support. This is what the user will see when they are presented with the purchase information from the App Store.
- Open your in app subscription and scroll down to the App Store Information section
2. Click on the + button next to localization and choose the language you want to provide the information for.
3. Provide a Subscription Display Name and a Description. This is what gets displayed to the user on the app store so be descriptive, Make sure your users know what they are purchasing. In our case, we can use something like All Access for the display name and you can use the same for the description.
Creating an App Specific Shared Secret
Glassfy needs to be authorized to connect to the App Store on your behalf and verify receipts and this requires the creation of an App Store Shared Secret.
- Click on App Specific Shared Secret
- Click on Generate App Specific Shared Secret to generate one
- Copy the shared secret and save it somewhere because we will need this in the next section.
This is all you need to now proceed to the next step and set up Glassfy and start testing your in-app purchase subscriptions.
Configure Glassfy to act on your applications behalf to communicate with the App Store.
The next step is to set up Glassfy so that it can act as the intermediary between your app and the App Store.
- Sign up for a free Glassfy account at https://glassfy.io
- When you create a new account, you will be asked not only for your name and organization, but also for the name of your first app.
Settings
There are 3 pieces of information on the Settings tab that are critical and required so that glassfy can manage purchase on behalf of the AppStore for your app.
- ApiKey: We will need this in your app to initialize Glassfy, so I suggest that you copy it and save it somewhere where you can retrieve it for your Xcode project.
- App Bundle ID: This is the Bundle Identifier that you will find in your Xcode target
- App Shared Secret: The shared secret that you generated in App Store Connect
Products
On the Products tab you need to create, minimally, a Sku and set Permissions
SKUs
Sku is short for Stock Keeping Unit and this is a unique identifier that identifies the feature that you wish to unlock through the subscription. For this reason, there should be a one-to-one match of the identifier entered here with the Product ID that you created for the subscription item in App Store Connect.
- Enter the SKU ID and then click on Add Properties to select the type of product purchase you are configuration
- Enter the same value in the App Store Product ID field
Permissions
Next up, we need to create permissions for each SKU. As we only have one SKU, there is only one permission
- Identifier: For semplicity we will use the same name as the SKU in this article but we recomend to use the name of the feature it is unlocking in your application: for example if it is unlock premium feature a good identifier will be
premium - Description: For the description, enter the same string that you used in the App Store connect localization description.
- Click on Add Sku and select the SKU
That is all there is to the glassfy setup.
Add the Glassfy SDK to your application and enable in-app subscriptions to verify, purchase or restore subscriptions.
With App Store Connect and Glassfy all set up, you can now integrate it into your Xcode Project
Install SDK
The first step is to install the Glassfy SDK. This can be done using either CocoaPods or Swift Package Manager. My preference is Swift Package Manager.
- From within Xcode, choose File > Add Packages.
- Enter the SDK URL into the search field
[https://github.com/glassfy/ios-sdk](https://github.com/glassfy/ios-sdk) - When the repository appears, change the dependency rule to Next Major version
- Click on Add Package
- Make sure Glassfy is selected and click on Add Package to add the package to your Xcode project
Initializing Glassfy
Glassfy has to be initialized before you can use it. The best place to do this is when your application launches. In a UIKit app, or in a SwiftUI app where you have created an AppDelegate, you can do that in the applicationDidFinishLaunchingWithOptions method. In a SwiftUI app without an AppDelegate, you can do this at the application entry point.
- Import Glassfy
- Add an onAppear modifier to the view being presented by the WindowGroup and call the Glassfy.initialize function.
This has one parameter; the apiKey that is provided in the Glassfy settings tab.
Glassfy Functions
With the SDK installed and initialized, you can utilize the Glassfy functions to access your products, verify subscription status and make purchases.
You have two options for each function. One that uses a Swift closure or callback and the second, which uses the new Swift Concurrency Async/Await functionality. The examples that follow will use the latter.
To prevent typing errors, I recommend that you create an enum that you can use that will provide you with a raw value representing one of your different Ids. It just so happens that we have only a single in-app purchase for our monthly subscription and we used the same id for the Sku and permission, but in the future, you can extend this enum to add new skus and permissions.
Note: It is also recomended to group SKUs in Glassfy as an Offering. In that case, you could add an additional enum within the Purchase enum for Offerings. I have commented out that enum in the code snippet below, but have left it here so that the offerings function will have an enum case for reference.
For semplicity we are using directly SKUs in this example. You can find more details about Offerings and displaying products to user here
enum Purchase {
enum Sku: String {
case monthly = “iOS_MGA_allAccess_monthly_199”
}
enum Permission: String {
    case monthly = "iOS\_MGA\_allAccess\_monthly\_199"
}
// enum Offering: String {
// case AllAccess = “Month_And_Yearly”
// }
}
Listing Offerings and associated SKUs
This function is not used in this example as we have no offerings, but it is included here for completeness sake.
guard let offerings = try? await Glassfy.offerings() else { return }
// This fetches all offerings but we can check for a single one and list the skus in that offering
if let offering = offerings[Purchase.Offering.AllAccess.rawValue] {
for sku in offering.skus {
print("\(sku.product.localizedDescription)")
print("\(sku.product.localizedTitle)")
print("\(sku.product.price)")
}
}
Retrieving a SKU
To retrieve a Sku and all of the information about it, you can call the asynchronous Glassfy.sku function passing in the sku id. This can be done within a .task block when a view appears or within an asynchronous Task unit of work. Once the sku has been retrieved, you have access to the sku properties.
.task {
guard let sku = try? await Glassfy.sku(id: Purchase.Sku.monthly.rawValue) else { return }
print("\(sku.product.localizedDescription)")
print("\(sku.product.localizedTitle)")
print("\(sku.product.price)")
}
This information can be used to display the purchase button on your app’s paywall.
Checking Permission Status
If you want to check to see if a particular permission has been enabled by way of a purchase, you first retrieve all of the permissions using the Glassfy.permissions function and then check to see if the specific permission you are checking for is valid. Again, this is an asynchronous call so it needs to be within a Task block like this:
Task {
guard let permissions = try? await Glassfy.permissions() else { return }
if permissions[Purchase.Permission.monthly.rawValue]?.isValid == true {
print(“User has purchased \(Purchase.Permission.monthly.rawValue)”)
// Update your UI
} else {
print(“Purchase has not been made.”)
}
}
Making a Purchase
To make a purchase, you need to provide the specific SKU to the Glassfy.purchase function. This will return a transaction object that will contain a permission object for which you can determine the validity of the permission. If the purchase was successful, the isValid property will be true.
Task {
// first retrieve the sku that you want to purchase (see above)
guard let transaction = try? await Glassfy.purchase(sku: sku) ekse { return }
if transaction.permissions[Purchase.Permission.monthly.rawValue]?.isValid == true {
print(“Purchase is successful”)
// Update your UI
} else {
print(“Purchase failed”)
}
}
Restore Purchase
Apple requires that you provide a way to restore a purchase should your device not be aware of that previous purchase. For this, you can use the Glassfy.restore function. This is very similar to the check permissions function above in that it will return a set of permissions and you just need to validate the one that you are checking for.
Task {
guard let permissions = try? await Glassfy.restorePurchases() else { return }
if permissions[Purchase.Permission.monthly.rawValue]?.isValid == true {
print(“User has purchased \(Purchase.Permission.monthly.rawValue)”)
// Update your UI
} else {
print(“Purchase has not been made.”)
}
}
Well done! Now you are ready to monetize your app with in-app subscriptions. Check out Glassfy to find tips on how to monitor your performance, and sign up for free today!
Read More